

I go through these phases - every once in a while - where all I want to do is learn new crochet stitches. I always try to incorporate something new into each of my designs.. whether it be a new stitch or a new way of constructing a garment. It's fun to change things up! Learning a new stitch can be inspiring. It can open up your mind to so many new possibilities. I have been wanting to make a wall hanging for a while now. Everywhere I look, I see these beautiful woven wall hangings. I could easily make one like them, but I wanted it to be more unique! I wanted to incorporate crochet. So, when I started researching new stitches.. I saw this stitch and I just knew I had to use it ….
Here is the FREE crochet pattern for the Sunburst Wall Hanging!
Pattern written & created by April Turner (@fibermeup)
-----------------------------------------------------------------------------
This post includes affiliate links. If you purchase through one of these links, I will earn a small commission at no extra cost to you. This is a great way for you to support my blog so I can continue to bring you all of the free content that I love to share! I only recommend products that I've personally used and loved. Thank you so much for your support ..
------------------------------------------------------------------------------

MATERIALS:
• 2 balls of cotton yarn in 2 different colors - one ball of each color (less than 280 yds.)
I used Premier Home Cotton yarn in Black and Cream.
• 2 balls of cotton yarn in 2 different colors - one ball of each color (less than 280 yds.)
I used Premier Home Cotton yarn in Black and Cream.
• Size H (5mm) crochet hook.
• Yarn needle (for weaving in ends)
• Scissors
• Yarn needle (for weaving in ends)
• Scissors
FINISHED SIZE:
Measures approx. 7.75" wide x 14.5" long (with fringe).
ABBREVIATIONS:
C = chain
Sts = stitch
SC = single crochet
DC = double crochet
DC 3-tog = double crochet 3 together
DC 6-tog = double crochet 6 together
PATTERN: worked from the top down (in multiples of 8 + 1) 9 more chains = one more burst stitch.
This pattern features the crochet Harlequin stitch. There are many helpful online tutorials to learn this stitch.


This pattern features the crochet Harlequin stitch. There are many helpful online tutorials to learn this stitch.


Row 1. Chain 32, *[DC 3x, C1, DC 3x] all in the 5th chain from your hook. Skip next 3 sts., SC in next, skip next 3 sts.* Repeat from * to * to the end. SC in the last stitch. Turn.


Row 2. C3, skip 1st SC and DC 3-tog (over the next 3 sts.) *C7, skip the next stitch (C1-space), DC 6-tog (over the next 6 sts.) - Be sure to leave the SC between the two groups of 3 UNWORKED.* Repeat from * to * to the last 3 DCs. Work one last DC 3-tog, then DC in the very last C1-space. Turn.


Row 3. C3, skip 1st DC and DC 3x (in top of the DC 3-tog) *SC in the C1-space between DCs - in the row below - enclosing the C7. [DC 3x, C1, DC 3x] in the top of the DC 6-tog.* Repeat from * to * to the last DC 3-tog. Work 3 DCs in the top of the DC 3-tog, then DC in the top of your turning C3 -- attaching the 2nd color.
*NOTE: I attached my second color in the last 'pull through' of the final DC, but you can fasten it off and re-attach the new color with a slip stitch at the beginning of the next row -- if you prefer.
Color #2


Row 4. C3, skip 1st SC and *DC 6-tog (over the next 6 sts.) - Leave the SC between the two groups of 3 UNWORKED. C7, skip the next stitch (C1-space)* Repeat from * to * to the end. C3, then SC in the top of your turning chain 3.


Row 5. C1, turn. Skip 1st SC and chain 3. *[DC 3x, C1, DC 3x] in the top of the first DC 6-tog. SC in the C1-space between DCs - in the row below - enclosing the C7.* Repeat from * to * to the end. SC in the bottom of your turning chain.


Row 6. Repeat Row 2.
Row 7. Repeat Row 3.


Row 8. Repeat Row 4.
Row 9. Repeat Row 5.
Continue on, repeating rows 2-3 and 4-5 -- until you've reached your desired length. I did it 2 more times.
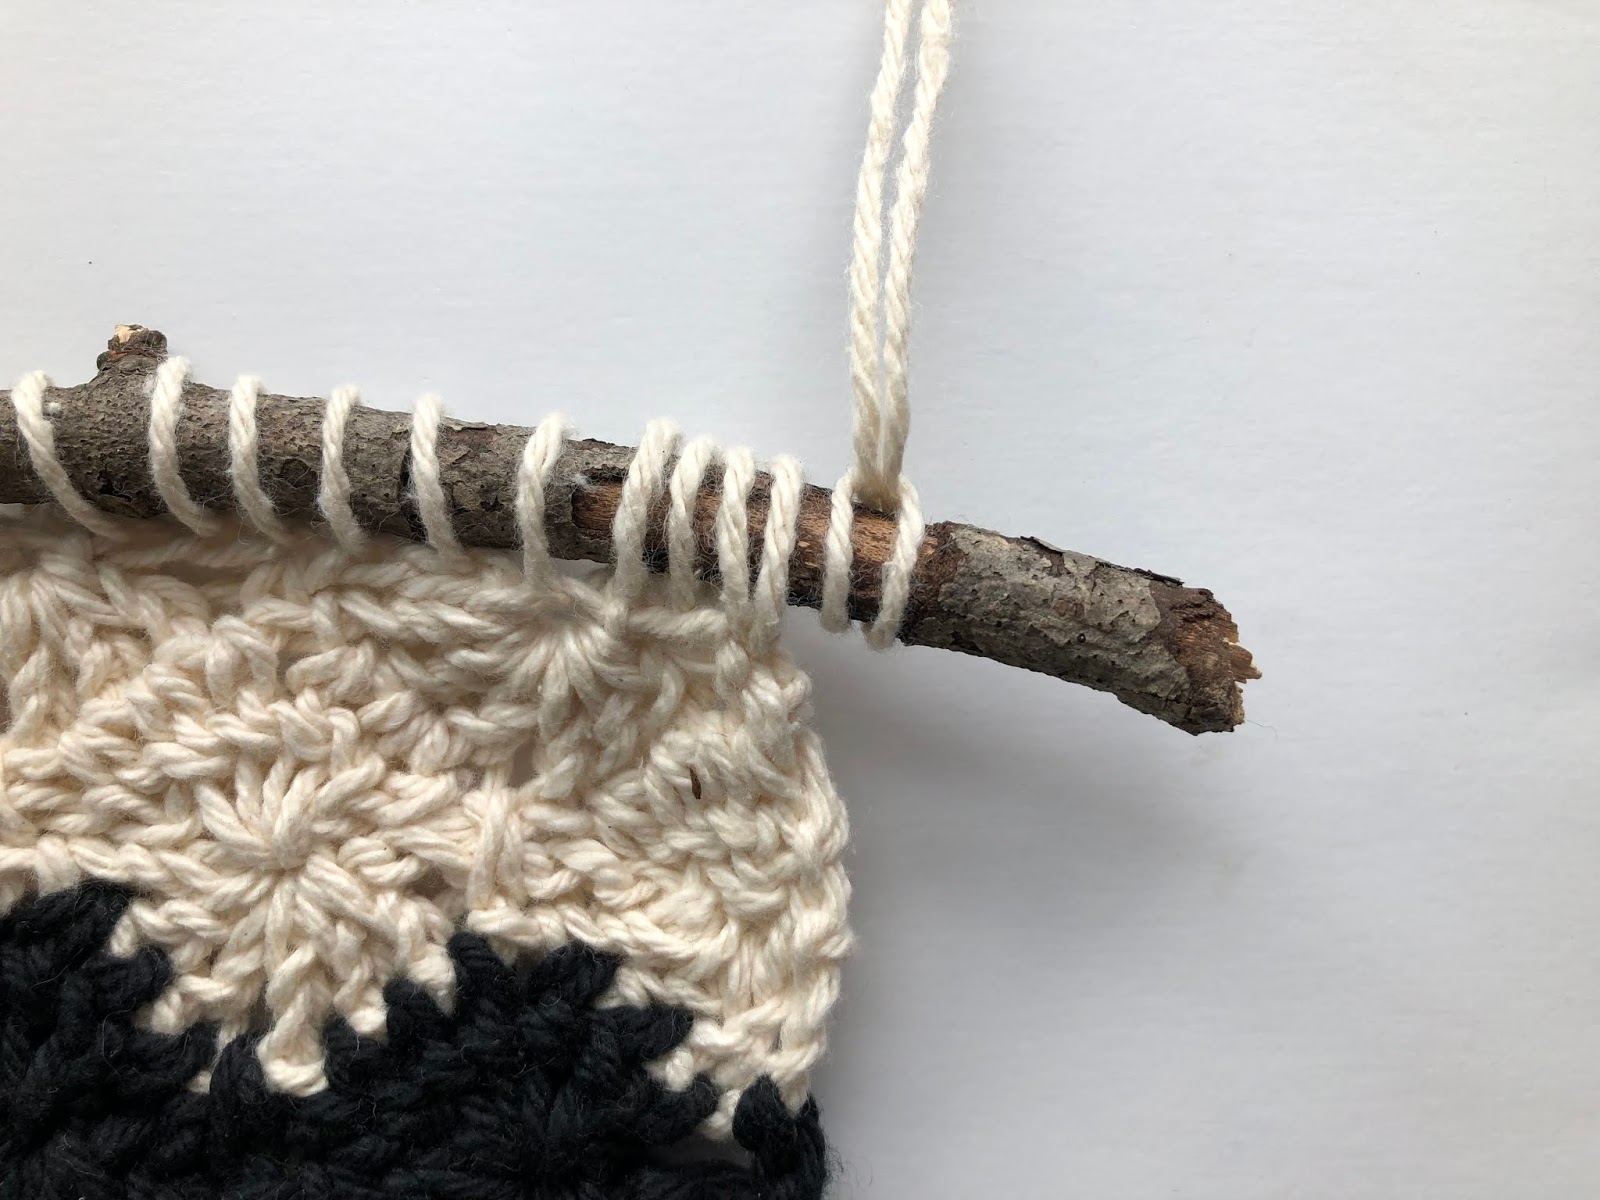
Attaching your piece for hanging:


Find a stick that measures approx. 10" long. This way it is just a bit wider than the wall hanging itself. You could also use a wooden dowel, if you prefer more of a modern (less rustic look) -- I liked the rustic feel it gave to this piece!
In your main color, cut a string - approx. 6x the width of your wall hanging. Knot one end of the long string to your beginning string. Begin looping it through the top stitches and around the stick. Continue across the entire piece.

Cut another string -- approx. 3x the width. Fold it in half. Slip knot it onto one end of your stick (or wooden dowel). Adjust the length of the hanger to your preference and knot it onto the opposite side. Trim and weave in all ends.
Adding your fringe:


Cut 33 strings - approx. 10" long -- in each color (for 66 strings total). Piece one string in each color together, fold them both in half.. loop them through one of the bottom stitches of your piece and secure them in place with a simple slip knot .. Continue adding the fringe across the bottom of your wall hanging, then trim.
Congrats! You've made the Sunburst Wall Hanging!

Tag me @fibermeup and use #SunburstWallHanging on your WIPs!
I love sharing and reposting all of your projects!
------------------------------------------------------------------------------------------
This is an original pattern. Please do not claim this pattern as your own. If you'd like to share the pattern, please link directly back to this post. You may NOT sell or distribute it, however you may sell any items made from the pattern. Please always credit the design to me: April Turner and provide a link back to my blog.
------------------------------------------------------------------------------------------
I hope you all enjoy creating with this FREE pattern!
If you have any questions, feel free to leave a comment down below.. or shoot me a DM on Instagram!
Happy Hookin'
Post a Comment